1.2.2.1. Controlling the LED
1.2.2.1.1. Light up a single color
The Finch has a Light Emitting Diode (LED) in its nose (see The Finch’s actuators for more information). In this lesson, we will learn how to light up the Finch LED in any color we like!
The first step is to drag an event from the “Events” block group into the script area. This event will tell Scratch when to start our program. For now, we will use the event that is triggered when the green flag icon is clicked.

Now we can connect blocks to the bottom of the “When <Flag> clicked” block, and those blocks will be run whenever we click the green flag.
The block that controls the Finch LED says “Finch LED color R: 0 G: 0 B: 0”. Drag this block into your script and connect it to the bottom of the event block.
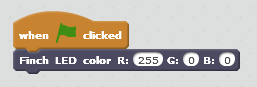
The three values in this block are the red (R), green (G), and blue (B) values of the color. A larger value for the color means more of that color will be lit up. The values can be anywhere from 0 to 255. Set the colors to “R: 255 G: 0 B: 0”. The LED should light up bright red when you click the flag icon.
1.2.2.1.1.1. Challenge
Try to set the Finch color to the following colors: green, blue, purple, yellow.
Hint: you will need to mix the colors to get the colors purple and yelllow. Ask a mentor if you need help.
1.2.2.1.2. Light up two different colors
Now let’s use a “Wait” block to make the light change color after 1 second. The “Wait” block can be found under the “Control” blocks. Drag the “Wait” block into your script, and connect it to the bottom of the “Finch LED” block. Then drag another “Finch LED block” into your script and connect it to the bottom of the “Wait” block.
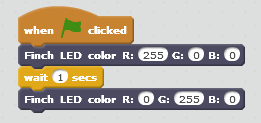
In the above example, when you click the green flag, the program Finch will light up Red for one second, and then the color will change to green, and it will stay that way.
1.2.2.1.2.1. Challenge
Can you make the Finch go through a pattern of colors and repeat forever?
Hint: You will need to use a “Forever” loop block from the “Control” blocks. Ask a mentor if you need help.
1.2.2.1.3. Control colors with the keyboard
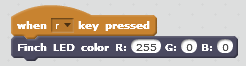
There are other event blocks besides the “When <flag> clicked” block that we used in the previous scripts. Under “Events”, find the block which says “When [space] key pressed”, and drag that block into your script. If you click on the down arrow next to the word “space”, you can select any of the space key, or any of the letter, number, or arrow keys on your keyboard. Set the key to “r”. Then drag a “Finch LED” block and attach it to the bottom or the “When [r] key pressed” block.
To allow Scratch to listen to your key presses, click on any blank space in your script window. Now press “r”. Your Finch should light up red.
1.2.2.1.3.1. Challenge
Can you write a Scratch program that will make your Finch light up red when you press the “r” key, green when you press the “g” key, and blue when you press the “b” key? Can you also make the Finch turn off its LED when you press the “space” key?
Hint: You will need to add three more “When [key] pressed” blocks, select the correct keys for each block, and connect a “Finch LED” block to each one. Ask a mentor if you need help.